Disclosure Policy

Saturday, October 9, 2010

A Couple Konad Manicures With Plate M70

I don't have a lot of time, I am in the middle of cleaning house while no one is here, but I thought I throw a few pictures up of manis I've done with plate M70. I bought this plate for the splatter paint design. This week I tried another of the designs on it and I liked it too!

The first pictures I am going to show you are older, when I really had no idea how to use my camera.

I used OPI Jade is the New Black- and this was the first time I wore a color in this family because I usually don't feel like they look good with my skintone. I really like this one though! For the konad design, I used China Glaze Metallic Muse. I love China Glaze's Chrome Collection for konading! I have two bottles of Metallic Muse, *after swapping one* and at least 3 bottles of Millenium. I really like Robotika for a fishnet print over OPI Tickle My France-y- I've wore that mani twice so far (a lot for me!) I know I will wear it again and I will definately post it when I do!

So OPI Jade is the New Black with China Glaze Metallic Muse and the splatter design from Konad plate M70:

Photobucket

Photobucket

Here is the one I did this week. It's OPI DS Mystery (the same polish I used with the spiderweb in my last post- I wanted to make sure it wouldn't give me issues when I used it on my friend, and I wanted to wear it anyway!) and I used China Glaze GR8 from the OMG collection. I don't really love this polish as a full mani with my skintone, but *love* it for konading!

Photobucket

Photobucket

Photobucket

Photobucket

Thanks for looking! Be on the look out for my next post, maybe another Halloween mani! ;) I've been thinking I will have my first giveaway at 100 followers, a few of my favorite polishes from one brand!

Thursday, October 7, 2010

Halloween Nails! Part 1 :)

Here are a couple sets of nails I've done for halloween so far... not my own, but my daugther's and a girlfriend's! They love the halloween nails. Admittingly, I'm not feeling them for myself yet, but I love to do them! I hope to have a bunch more on here before halloween too! As many times as I can force them to let me do them ;) jk.

Here's my friends nails. We used OPI DS (designer series) Mystery for the main color and China Glaze GR8 for the konad. The color combination was amazing! Mystery is a super, super dark purple that may look black in a lot of light, but had gold odd shaped small pieces of glitter flooding it, making it 'glow from with in' and also helps the purple reflect in the sun. I did choose to use 3 coats of top coat though. It seemed to suck the 1st layer up completely, the 2nd layer looked okay, but the 3rd layer made it look like glass! 1st topcoat was Seche Vite, 2nd was Barielle Manicure Extender and 2rd was another layer of Seche Vite.

Photobucket

The hologram spiderweb looked so neat in the sun!

Photobucket

The next one I have for you is my daughter's nails from today. Unfortunately, the Orange Color Club polish I used doesn't have a name on it. I got it in a set at Ross when I was on vacation. It is a creme, so it isn't Tangerine Scream from the Electro Candy Collection, it is a total neon, so the pictures are not color accurate and it is much more of a true orange than Amp'd Up, so if anyone knows what color this is from the description I just gave, I'd love to be filled in!

The other colors I used were WnW Black Creme for the spiders, China Glaze Millennium for the spiderweb on the ring fingers and the Art Deco nail art polish in silver for line of web coming from the spiders.

Photobucket

Photobucket

Photobucket

Photobucket

Photobucket

I hope you liked these! I used the bundle monster plate # 13 for both! :)

Tuesday, October 5, 2010

Fast Change For Your Mani or Easy Nail Art!

I'm sure there are a lot who will come across this blog, that don't have any sort of a stamping kit, but would still like to wear something a little bit different, besides just adding some glitter. So I really wanted to share an easy way to do something different!

All you need is some cheap scotch tape and 2 colors you would like to see together! or if you already have a color on, you are bored with it, but don't have time to change your mani completely- this is a great way to go!
A diagonal mani!

Photobucket

I prefer this tape over the regular 'Scotch' tape brand b/c when I have tried the scotch brand, it took off some of the polish from underneath.

Here is the mani I had before adding to it:

Photobucket

So if you are doing this over your existing color, you don't need to wait for it to dry. If you are doing this from the start, I recommend you do your base color just like you would a normal mani, top coat and all, so it will dry faster, and once it is, all you do, is get your tape out, and go like this:

Photobucket

I do realize this picture became slightly distorted, I will work on fixing it in future pics!... it is from my watermarking, I think- I may have to skip the glitter effect! :)

I find it easier to tape all of one hand, then tape the other after you've polished the first hand. You'll have to see what works best for you. Once you've taped, it looks like this:

Photobucket

The tape doesn't have to be pushed down on the whole nail. Only along the dividing line. Sometimes I do have to make sure the free edge and the edge near the skin are pushed down again when I go to put the polish on. Then you add your polish and it will look like this:

Photobucket

Then I carefully pull the tape off while the polish is still wet. In my experience, if you let it dry, some of your crisp line will come off with the tape. So- polish, remove tape, polish next nail, remove tape ect.

Once you remove the tape, it will look like this:

Photobucket

distorted picture again, glitter's gotta go it seems.

Once you polish all over your nails, add a top coat and you're done! I didn't plan on keeping this mani on, so I tried different colors with the base color to see what I liked most. Here it is:

Photobucket

So which color do you like most with this base color?

I hope this helps give you an easy idea for something a little different!

Here is the one I did over the weekend- it only took me 10 minutes at most to add this plus a top coat!
Photobucket

Thanks for reading! I can't wait to start on my next post! Also, please click on the little follow button at the top of the page, and follow me! :)

Saturday, October 2, 2010

Product I Use When I Do My Nails And More!

My normal routine for my manicures goes like this:

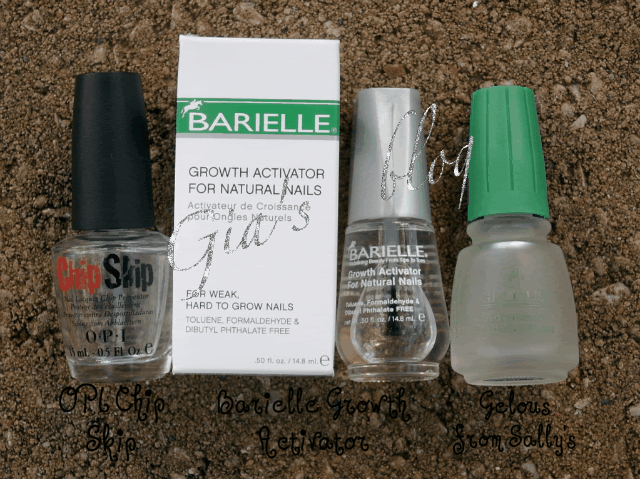
A PH Balancer- In my opinion, this is *so* important. A lot of people just wipe their nails w/ acetone or Zoya Remove instead of a PH Balancer and feel that it does the same thing. It may, but for me, using this was the key to my polish not chipping. I had used acetone before, but I am telling you, once I started using this, I had maybe one chip in 6 months. I started using one before I ever started using a basecoat (Silly, I know- I was still learning!) I started out using Nail Tek Step One. It took me a year to run out of the bottle and I can't tell you how many manis I did! My own, my daughters, tons of her friends, a few of my friends, my sisters (I have 3) and my mom- all numerous times! Once I ran out, I planned on getting a new bottle, but I can only find it online now and I don't do online orders very often. So I had a bottle of OPI Chip Skip I got for free at Beauty Brands, they had a promotion at some point when I bought an OPI polish or two. I've been using it for a few months now and it's doing fine, so I haven't felt the need to order the Nail Tek.

The perfect basecoat is different for every person, so I will just tell you about the ones I'm really liking right now. Barielle Growth Activator: it's a pretty expensive one, though in the past I have found it at places like Marshalls and TJ Maxx. The other one I really like, which is much cheaper: Gelous from Sally's. I could be wrong, but I think it's under $5. It's a super smooth base for your polish and if I didn't have the Barielle, I would be totally happy with Gelous! I usually use the Gelous on top of the Barielle, then move on to my polish. There are so many base coats out there, you just have to find one you like. Base coats can prevent staining from colored polish, different types provide a treatment, they add an extra layer of protection to you nails and more.

Here's a picture of the products I wrote about above, except the nail tek, which I don't have anymore. I added the box of the Barielle, so you may recognize it if you would walk by some.
Photobucket


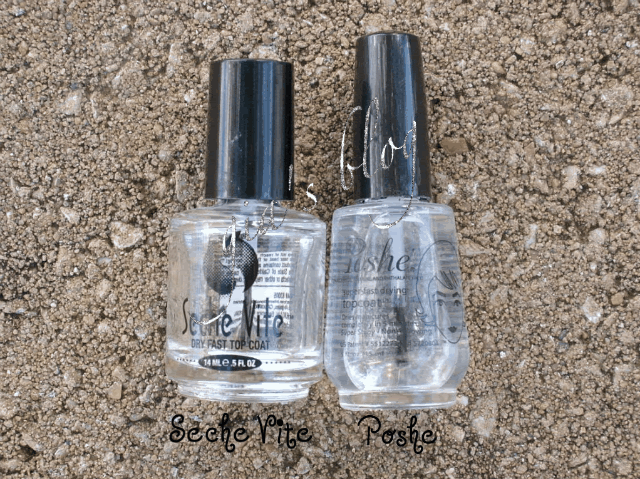
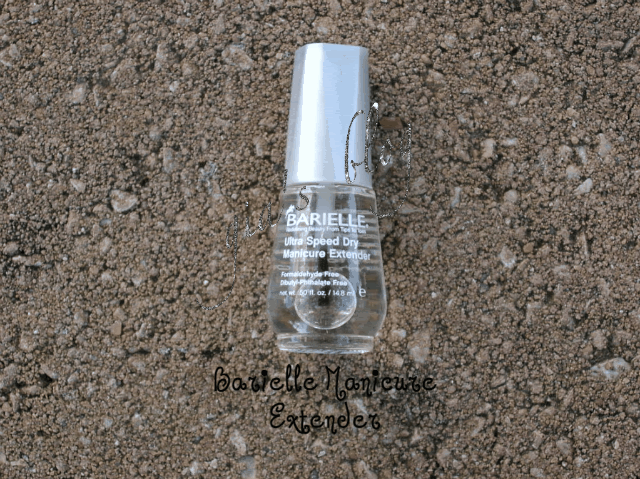
The topcoat I like most is Seche Vite. There are times I use the Barielle Manicure Extender under Seche Vite, but it's not needed! Some people prefer Poshe. While I like Poshe (it's really glassy looking, although I think Seche Vite is too), it seems to get scuffed up easier on me. A quick dry top coat is essential though! Sally Hansen also has some good ones, Insta Dry in the red bottle is especially great with the Insta Dry in the clear bottle running a close second! I am not sure if the formula is different between the 2 actually, but the brush in the clear bottle is very different, very wide. I would never even bother to paint my nails with out a quick dry top coat! If you are on a budget- (I know most of us are!) I have found Poshe at Dollar General for $3 - at Beauty Brands it's $10 and at Sally's it's $7 I think, along with Seche Vite.

Here's a picture of Seche Vite and Poshe:
Photobucket

And this is the Barielle Manicure Extender, it comes in a box like the one in the picture above, but the colored line on the box would be a different color:
Photobucket

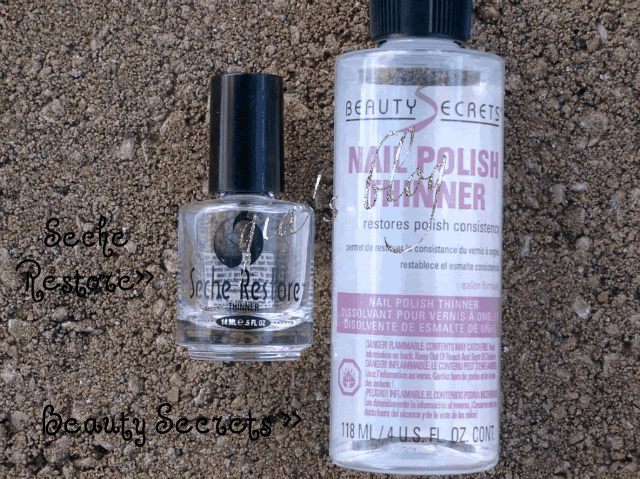
Lastly, an important product to have, is thinner! Don't use acetone to thin your polish when it gets too thick! It will ruin it, maybe you won't notice right away, but it will! I prefer to use Seche Restore in my Seche Vite. A lot of girls have no problem using the Beauty Secrets in thier Seche Vite, but I feel I get the best results with Seche Restore. In the majority of my other polish I use Beauty Secrets, again, from Sally's. Once in a while in older polishes I feel are special to me, I do use my Seche Restore, but not very often at all.

Most newer polishes are 'Big 3 Free' meaning they do not contain these 3 chemicals, which are considered 'toxic' that a lot of older polishes do contain at least one of. 1) Toulene (this is in Seche Vite and also in Seche Restore which is why I prefer to use Seche Restore in my Seche Vite) 2) Formaldehyde and 3)Dibutyl Phthalate (DBP) Many do not feel this is an issue to them and honestly, when it comes to my polish, I use both old and new polishes. A lot of girls do prefer to use big 3 free products when they are pregnant- Barielle is B3F and Poshe is a B3F topcoat. There is a lot to discuss when it comes to these chemicals, so I will have to save that for a future post.

Here are pictures of the the 2 thinners I wrote about- just so you know what to look for!
Photobucket


In my last post, I used a plate from bundle monster for the feather design.

You can get 21 bundle monster plates on amazon for $18 and free shipping. It's possible you can get a stamper, scraper and 1 plate at Ulta, by Essence, for $3 (or when I grabbed it a couple weeks ago, it was half off, so $1.49) you will have to check your store though. Other wise, you may have to order a stamper and scraper, although for the scraper, I use a razor blade that has a handle. Some prefer to use a plastic scraper or to cut a plastic card like an old credit card and use it to prevent the metal from scarping the plate. This hasn't been an issue for me personally and I feel like the razor blade gives me the most crisp image. I got a set at Home Depot for probably $4 that came w/ a holder for the razor blade and I'm not sure how many blades. I have used the regular konad metal and plastic scraper and before a couple months ago, I always used the metal scraper, but since I tried the razor blade, I haven't looked back!

That's all for today, I hope something in this post helped you learn something new! Thanks for reading and comments are welcome!